Category Archives: Moyea PPT to DVD Burner Pro

How to save PowerPoint to DVD with Moyea PPT to DVD burner Pro?

You might come across such a situation: made a PowerPoint presentation and find it cannot be played out on another computer as it doesn’t have the right PowerPoint version or operating system. And then you might wonder is it possible to create a PowerPoint presentation that plays anywhere, no matter what software a user has on his computer or even use a DVD player.

Actually, you just need convert your PowerPoint to DVD as computers and DVD player will well support DVD files. Next, this post will show you detail guide about how to save PowerPoint to DVD with Moyea PPT to DVD burner Pro, which is one of the best PPT to DVD burner in the world.

To get started, download Moyea PPT to DVD burner Pro first.

Guide: how to save PowerPoint to DVD with Moyea PPT to DVD burner Pro?

1. Import the PPT files to the program

After started the PPT to burner pro, just import the PPT files by clicking add button or import button. You can maximum input 12 PPT files at each conversion.
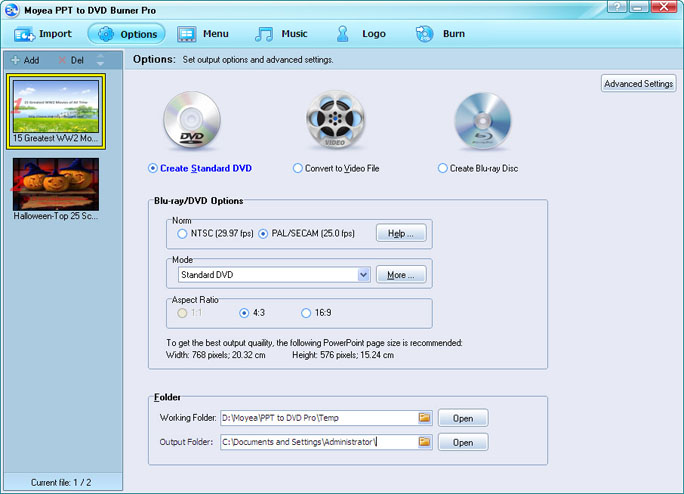
2. Decide output

In the menu bar, click “options” and choose “create standard DVD disc”. Adjust related terms such as Norm, Mode, Folder and advanced settings if necessary.

3. Choose DVD menu

Simply press “menu”, you will see the menu panel. Multiple DVD menu templates are provided for you to choose from. Choose one you like best or click “menu Creator” for making your own DVD menu.

4. Convert PowerPoint to DVD

Finally click “burn” to enter settings and burn panel, where you can set some parameters and click “start” to finish burning PPT to DVD.

Tips: Moyea PPT to DVD burner Pro provides you 2 extra features, including Music and Logo. In music, you are able to add background music or record voice narration. In logo panel, you are permitted to add company logo or personal watermark.

Tips on how to burn PPT to DVD

If you are looking for solution to burn PPT to DVD as well as main all the original effects like animations, pictures and video clips, etc, then this paper will be your reference guide since it will show you tips on how to burn PPT to DVD.

Burn PPT to DVD could be very easy because you can make use of a PPT to DVD burner. This PPT to DVD burner can perfectly burn PPT to DVD as well as allows you make DV menu. With a friendly user interface, you can easily burn PPT to DVD with a few clicks and minutes. Next, let’s download the PPT to DVD burner and have a try on it to burn PPT to DVD.

1. Load the PPT files

Launch the PPT to DVD burner and click “add” or “import” to load PPT files. You can maximum add 12 PPT files at each conversion.

2. Choose output

In the menu bar, click “options” and choose “create standard DVD disc”. Adjust related terms such as Norm, Mode, Folder and advanced settings if necessary.

Related Terms
Norm: Refers to the TV standard for your DVD output. Generally, NTSC applies to American users while PAL applies to European users. If you are not sure which one it should be, click “help” to check it.
Mode: The mode of DVD output. The Aspect Ratio of ‘Create Standard DVD’ is composed of 4:3 and 16:9.
To learn more about aspect, encode size and display size, hit “More”.
Folder: Includes the paths for the working folder and the output folder. Make sure the two paths are different, for all the files located in the working folder will disappear with the completion of the conversion.

3. Develop DVD menu

Simply press “menu”, you will see the menu panel. Multiple DVD menu templates are provided for you to choose from. Choose one you like best or click “menu Creator” for making your own DVD menu.

You can make your own main menu and title menu with rich features in the Menu Creator. PPT to DVD Burner lets you customize a DVD menu with abundant background fill, frame styles, icon styles and frame colors.

4. Burn PPT to DVD

Finally click “burn” to enter settings and burn panel, where you can set some parameters and click “start” to finish burning PPT to DVD.

How to convert PPT to DVD?

Feel frustrated because you cannot watch your favorite PPT files on your DVD player and HD TV set? Now, this paper can help you much by providing you solution to convert PPT to DVD so as to enjoy PPT files on DVD player and HD TV set.

Converting PPT to DVD surely requires a PPT to DVD burner pro, which will achieve the conversion and also maintain the original effects such as animations, pictures, video clips, etc. additionally, you can use this PPT to DVD pro to add some extra features such as voice narration for each slide and watermark. What’s more, you can choose one DVD menu template for the pre-installed templates or make you own by using the DVD menu creator.

Following, please look into how to convert PPT to DVD with a PPT to DVD burner pro.

1. Run the program and add PPT files

Just run the PPT to DVD burner pro on your computer and click “add” to input PPT files. You can add up to 12 PPT files per conversion.

2. Choose output option

In the menu bar, click “options” and choose “create standard DVD disc”. Adjust related terms such as Norm, Mode, Folder and advanced settings if necessary.

3. Make DVD menu

Toggle to the Menu tab. The Blu-ray/DVD Menu interface appears. Multiple DVD menu templates are provided for you to choose from. Choose one you like best or click “DVD menu Creator” for making your own DVD menu.

You can make your own main menu and title menu with rich features in the Menu Creator. PPT to DVD Burner Pro lets you customize a DVD menu with abundant background fill, frame styles, icon styles and frame colors.

4. Add background music or voice narration

The Music feature gives you an alternative to sound inserting and narration recording in PowerPoint.

5. Credit your work by add logo or watermark

If you are afraid of unwanted modification to your or DVD slideshow, you can take advantage of the Logo feature in the PPT to DVD burner pro.
\

6. Convert PPT to DVD

Once everything is ready, it’s time to click “burn” to enter settings and burn panel.

Note: To burn your PowerPoint file directly to a DVD Disc, you should have a writable DVD and a third-party DVD burner on your PC.
Finally click “start” to convert PPT to DVD with this PPT to DVD burner pro. After conversion, you can easily enjoy the output on DVD player and HD TV set.

How to watch PPT files on Samsung Galaxy Note?

Want to use your Samsung Galaxy Note to watch PPT files? This paper will share you how to watch PPT files without PowerPoint tool on Samsung Galaxy Note.

Samsung Galaxy Note is a phone-tablet hybrid released by Samsung on this FIA. The fuselage size of this machine is 146.85*82.95*9.65mm. The main features of this machine must be the 5.3 inches touch screen which has a resolution in 1280*800 and the S pen. It has applied the Android 2.3 operating system and 1.4GHz dual-core processor. In addition, it has powerful multimedia functions since it could almost support all the known video formats such as MP4 and WMV, etc.

To watch PPT files without PowerPoint tool on Samsung Galaxy Note, you just first convert PPT to Samsung Galaxy Note supported video foramt by using a PPT2video converter.

Step 1: download a PPT2video converter
Just download a PPT2video converter and install it on your computer.

Step 2: add PPT files
Please start the program and input the PPT files to it by clicking the add icon.

You can click the buttons under the view screen to view the PPT file. And then choose a video format as output video format and designate a folder for the output video.

Step 3: customize
After input the PPT file, you are able to click “Customize” to customize the timing, slides, music, audio and conversion.

Of course, if you have set the transition time on the source PPT, you don’t have to set it here. Add some background music for the output video according to your preference.

Step 4: audio and video settings

Click the settings icon to adjust the video codec, video size, bite rate and some other options of the output vide.

Step 5: convert PPT to video
When you have completed all the settings, please click “Start” to start the PPT to video conversion.

Wait until the program finished the PPT to video conversion and open the output folder for you. Transfer the video to Samsung Galaxy Note and enjoy yourself.

Way to convert PPT to flash video

PPT, as we know, cannot be uploaded on many websites, especially video sharing websites like YouTube. But sometimes we made some excellent PPT files and just want to share it to others on YouTube, how can we achieve it? The best answer must be converting PPT to flash video. In this way, we could well convert PPT to video in high quality as well as keep all the original animations, videos, pictures and sound of the source PPT file. And the most important is we could easily post it on YouTube and other websites like FaceBook.
Next, let’s go over how to convert PPT to flash video.

First, you need PPT to video converter and install it on a computer.

Second, just start the program and input the source PPT file.

You can view the source PPT file just by clicking the buttons under the view screen. Choose the output video as FLV and designate a folder for the generate video.

And then, click “settings” to customize the audio and video display effects of the generated video.

You can customize the bite rate, video size and video codec and some other options here.

Fourth, simply click “Customize” to customize the timing, music, audio, slides and conversion.

The transition time between slides cannot be less than 6 seconds, or else it will get worse effects. In addition, if you have set it on the source PPT, you needn’t set it here. Choose an appropriate music for the generated video and ignore the audio in the original PPT file.

At last, just press “Start” to convert PPT to flash video. The PPT to flash video conversion will be finished in no minute.

Wait until the PPT to video converter open the output folder for you.
Just watch the output video and upload it to YouTube or even your FaceBook account.

How to use Panasonic BW880GKK Blu-ray-player to perform PPT

DMR-BW880GKK is, launched by Panasonic Electronics, a hard disk drive Blu-ray recorder. It is able to record digital TV programs and HD video in lossless way, while the DVD recorder cannot do that.

The industry generally believes that in the future Blu-ray players will become the master of high-definition playback device. And at this stage, the features of the Blu-ray player are relatively simple, pure disc playback has restricted its cost performance. The latest Panasonic DMR-BW880GKK not only perform as Blu-ray Players during the discs, but also has burning, high-definition video copy and other functions, increasing product cost performance in the case of constant price. As a good player, it has the basic characteristics of the output image, high definition, good color reproduction, comprehensive audio support, etc. Furthermore, this Blu-ray drive also has a large capacity hard drive 500G and can support high HD video recording for easy collection.

Panasonic DMR-BW880GKK Blu-ray player supports BD / DVD, SD cards and USB playback disc player, supports 1080P digital output, transmitting  high-resolution screen, recording and playing full HD quality, reproducing beautiful clear image. It is not only compatible with Blu-ray recorders BD-R/BD-RE, but also compatible with DVD R / DVD-R, DVD R / DL, DVD-R/DL, DVD RW / DVD-RW, DVD-RAM. With advanced variable bit rate quality video, high-speed copying, you can burn BD and DVD format discs. It has three utility functions: a manual recording, DV input automatically burn and AV smart burn. In addition, the Panasonic DMR-BW880GKK can easily record the HD (AVCHD format), SD (MPEG2 format) video in Panasonic cameras and copy to HDD or disc in permanent preservation.
Therefore, to watch PPT on DMR-BW880GKK we only need to convert ppt convert video or DVD / Blu-ray Disc format.

Before conversion, we need to prepare Moyea PPT to DVD Burner Pro and install it.

If we want to convert PPT to DVD/Blu-ray, the steps are as follow:

Step 1. Import PPT files

Step 2. Output Blu-ray/DVD options (Advanced Settings)

Step 3. Customize Blu-ray/DVD menu

Step 4. Add Music

Step 5. Burn to DVD/Blu-ray

If we want to convert PPT to video, the following is the operation:

Step 1. Import PPT files

Step 2. Output video options (Advanced Settings)

Step 3. Add Music and Record voice

Step 4. Export video files

After conversion, just copy and paste the converted files to this machine. Then, we can preview the PPT on DMR-BW880GKK